
Before you begin
Have these four things ready before changing the WordPress site.
Administrator accessYou need permission to install plugins and edit pages.
A supported websiteWordPress 6.0 or later, PHP 7.4 or later, and an HTTPS website.
The pluginUse the WordPress directory listing when available, or the ZIP supplied by CampaignSquad.
Your studio serial keyCampaignSquad supplies this key. Treat it as a private activation credential.
Install and activate the plugin
Choose either installation route. Do not unzip the package before using WordPress upload.
- 1
Install from WordPress
Open Plugins > Add New Plugin, search for Kalura Widgets, select Install Now, and then Activate.
- 2
Or upload the ZIP
Open Plugins > Add New Plugin > Upload Plugin, choose kalura-widgets.zip, select Install Now, and then Activate Plugin.
- 3
Open the setup page
After activation, open Kalura Widgets > Setup. A warning remains visible until a valid studio serial key is saved.
Validate and connect the studio
Activation connects this WordPress site to the correct CampaignSquad studio without exposing the serial key in the browser.
- 1
Enter the serial key
Paste the complete key into Serial key. Avoid leading or trailing spaces.
- 2
Save changes
WordPress securely sends the key to CampaignSquad. A successful response returns and stores the studio site key.
- 3
Confirm activation
Look for “Kalura Widgets was activated successfully” and an “Activated:” line followed by the studio site key.
After activation, the serial field is disabled and masked by design. Use Deactivate to remove the studio connection. The stored site key is injected as window.CampaignSquadConfig.siteKey; the serial key is not sent to the visitor’s browser.
Choose how the account avatar appears
The two settings are related, but they perform different jobs. Start with automatic placement and move to manual placement only when the theme requires it.
Avatar placement
Chooses automatic insertion, manual shortcode insertion, or no avatar.
Automatic menu location
Chooses the target menu in a classic theme. It is only used when Avatar placement is Automatic menu insertion.
Option A: automatic placement
Recommended for standard classic themes and WordPress block themes.
- Set Avatar placementChoose Automatic menu insertion.
- Set the menu locationStart with Automatic (recommended), save, then check the public website.
- If the avatar is missingFor a classic theme, return to settings and explicitly select the Header, Primary, Main, or equivalent menu location.
ClassicClassic themes: Kalura hooks into wp_nav_menu() and appends the avatar to the selected menu. Automatic detection checks common locations such as primary, menu-1, header, top, and main.
BlockBlock themes: Kalura hooks into the core Navigation block and appends the avatar to the first navigation block rendered on the page. The Automatic menu location selector does not target block-theme Navigation blocks.
Option B: manual placement
Use this when automatic placement chooses the wrong navigation, when a header builder accepts shortcodes, or when a custom theme bypasses WordPress navigation APIs.
- Change the modeSet Avatar placement to Manual shortcode insertion and save.
- Use a Shortcode blockIn the Site Editor, page builder, widget area, or header builder, add a Shortcode block and insert the avatar shortcode.
- Use PHP only when necessaryFor a custom coded header, add the PHP example to the appropriate child-theme template or template part.
[kalura_avatar_menu]<?php
echo do_shortcode( '[kalura_avatar_menu]' );
?>OffNo avatar: choose Do not display an avatar. Timetable shortcodes continue to work normally.
Build the timetable page
Create or edit the page that will host the studio timetable. The shortcode builder creates the correct shortcode from your studio’s current timetable data, so you do not need to look up IDs manually.
Use the timetable shortcode builder
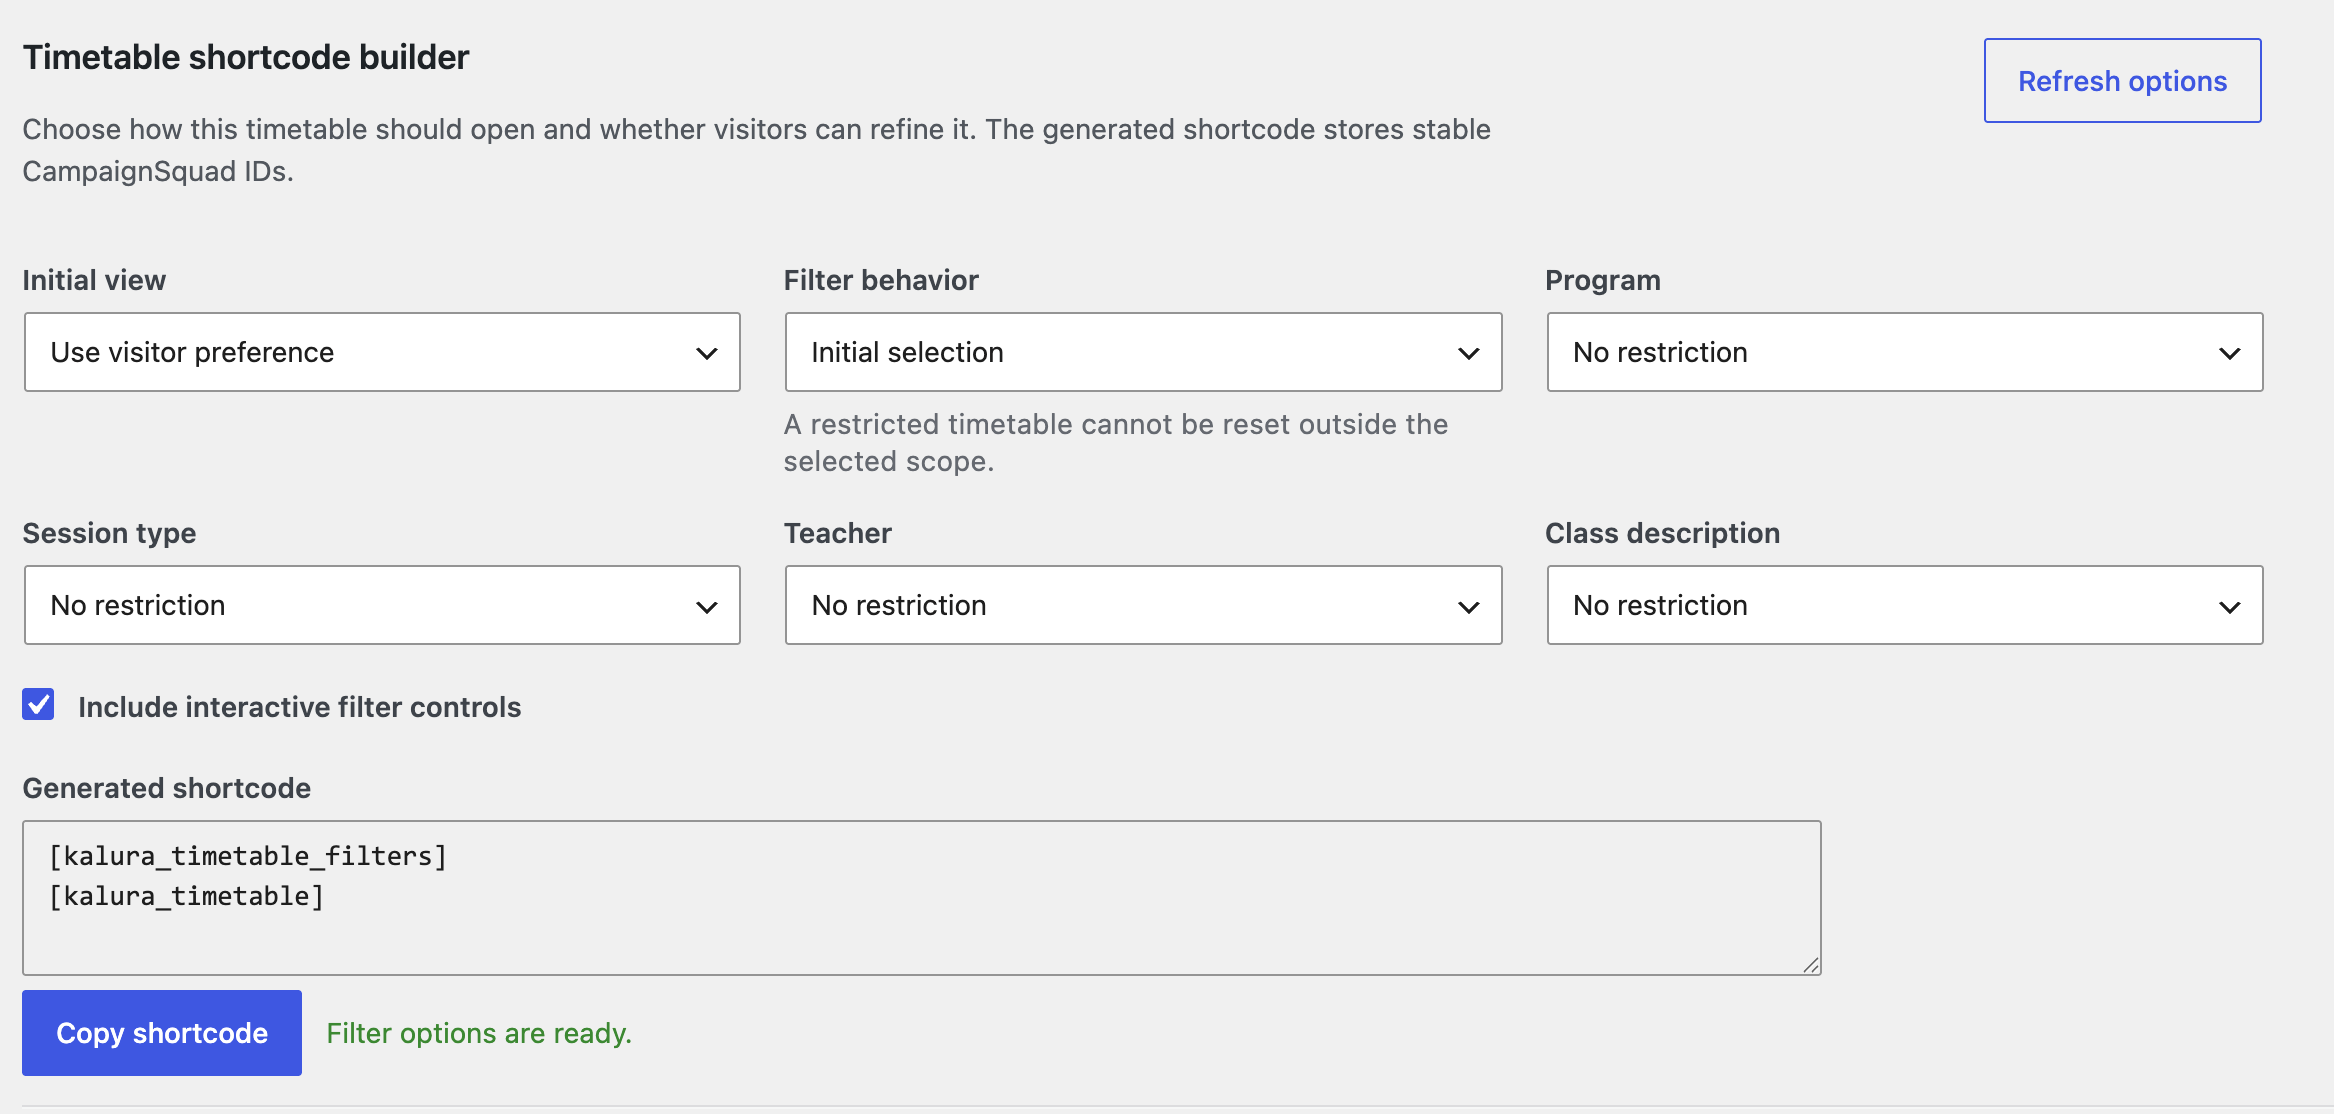
Go to Kalura Widgets > Build shortcode / permalink after activating the plugin. The builder securely requests the available programs, locations, session types, teachers, and class descriptions from CampaignSquad in real time. Use it to create either a shortcode or a pre-filtered permalink to a published timetable page.
- Load the current optionsWait for “Filter options are ready.” Select Refresh options whenever the studio schedule or filter list has changed.
- Choose the starting timetableSet an initial grid or list view if needed, then select any program, session type, teacher, or class description. For a promoted landing page, select one or more individual Classes; the shortcode stores their comma-separated class IDs.
- Set the filter behaviourChoose Initial selection to preselect options that visitors may change, or Restrict timetable to keep the timetable within the selected scope. Selected Classes always restrict the timetable to those exact scheduled classes.
- Choose visitor controlsKeep Include interactive filter controls enabled to generate the filter shortcode above the timetable. Turn it off for a timetable without on-page controls.
- Copy and pasteCopy the generated shortcode and paste it into one WordPress Shortcode block on the timetable page. Publish or update the page.
Check for duplicate shortcodes
After publishing, go to Kalura Widgets > Check duplicate shortcodes and select Scan for shortcode conflicts. It lists published content with more than one timetable or filter shortcode and gives you a direct Edit content link. The scan checks WordPress content only; it cannot detect shortcodes added through custom theme PHP or stored only in third-party page-builder data.
Manual shortcode reference
1. Timetable filters
Displays view, program, teacher, session type, and class-description controls.
[kalura_timetable_filters]2. Timetable
Displays the class grid or list and the complete booking journey.
[kalura_timetable]Publish or update the page, then view the public URL rather than relying only on the WordPress editor preview.
Verify the complete client journey
Run this check in a private browser window so an existing administrator session cannot hide problems.
- The avatar appears once in the intended desktop and mobile navigation.
- Selecting the avatar opens the Kalura account experience.
- Filters appear above the timetable and update the visible classes.
- The timetable works in both grid and list views.
- A client can sign in, book a class, cancel where permitted, and view bookings or passes.
- The page remains usable at phone, tablet, and desktop widths.
Updates and maintenance
Plugin settings, including the validated studio key, are stored in WordPress and remain in place during a normal update.
WordPress updates
Open Dashboard > Updates or Plugins and install the available Kalura Widgets update.
Automatic updates
When offered by WordPress, select Enable auto-updates beside Kalura Widgets on the Plugins screen.
ZIP updates
Upload the newer ZIP through Add New Plugin > Upload Plugin and choose Replace current with uploaded when WordPress prompts.
After updating
Clear caches and repeat the avatar, timetable, login, and booking checks from the verification section.
Troubleshooting
Work from configuration to theme integration before changing code.
The shortcode is displayed as text
Confirm Kalura Widgets is activated, use a WordPress Shortcode block, publish the correct page, and clear caches.
The automatic avatar does not appear
Confirm activation and Automatic menu insertion. On a classic theme, select the exact menu location instead of Automatic.
The manual avatar shortcode is empty
Set Avatar placement to Manual shortcode insertion. The plugin intentionally ignores the manual shortcode in automatic or disabled mode.
The avatar appears in the wrong block-theme menu
Switch to manual placement. Block themes receive the avatar in the first rendered core Navigation block.
The timetable area is blank
Confirm the Activated site key is shown, use each shortcode once, clear optimization caches, and check for an administrator warning about missing build files.
The serial key cannot be validated
Check the key, confirm outbound HTTPS access to api.campaignsquad.io, and retry. Contact support if the API returns a rejection.
A custom theme still does not work
Use the child-theme PHP placement, then send support the site URL, active theme name, and browser-console errors.
Ready for clients
Once the private-window verification passes, Kalura Widgets is connected to the studio and ready to handle account access, timetable browsing, and bookings.